One server, eight dedicated CPU cores, 16 gigabytes of ECC RAM, my own git hosting, my own website hosting, and Claude Code running directly on the machine. 29.61 euros a month, no contract, set up in under an hour.
Before this, my portfolio ran on Vercel and my code lived on GitHub. Both work fine. But my deployment pipeline was spread across two companies I have zero control over. Vercel Pro is 20 dollars a month the moment you go past the hobby limits; GitHub is another 4 to 21 depending on the plan. And if either changes its pricing, its terms or its build limits, I find out by email.
There is a second reason that sounds less like principle and weighs more day to day: every time I want to test something on a real server, I need a real server.
The machine
NetCup RS 2000 G12:
| CPU | AMD EPYC 9645, 8 dedicated cores — not shared |
| RAM | 16 GB DDR5 ECC |
| Storage | 512 GB NVMe on a hardware RAID controller |
| Traffic | Flat rate |
| Location | Nuremberg, Germany |
| Price | 29.61 euros a month including 19 per cent German VAT |
Two honest notes on the price. First, I take the one-month term: one month minimum, monthly billing, cancel whenever. Committing to twelve months takes 17 per cent off — about 25 euros a month — but it is billed a year at a time, roughly 300 euros up front. I pay the extra five a month to stay flexible.
Second, first orders come with a 30-day satisfaction guarantee. If you follow along and hate it, you get your money back.
Location is worth reading closely: "Europe, no preference" is about four euros cheaper, but then the machine lands in Austria, Germany or the Netherlands and you do not get to pick. I wanted Nuremberg, so I pay for Nuremberg.
Phase 1 · Ordering
After ordering, most people trip over the same thing: NetCup has two panels, with separate credentials, both arriving by email.
- CCP, the customer control panel: contracts, invoices, upgrades.
- SCP, the server control panel: the actual machine.
You want SCP. Under "Servers", pick the machine, go to media/images, select Ubuntu 22.04.5, have it create an additional user on the settings page, and start the installation. At the end NetCup shows you the root password. Copy it — you need it in exactly one minute and never again.
Two more things before moving on, and both save time later:
A snapshot of the clean install. Phase 3 changes the SSH configuration, and if that goes wrong I want a thirty-second way back rather than a reinstall.
The DNS record, now. An A record for the subdomain — git.damjan-savic.com in my case — pointing at the new server IP, with the lowest TTL available, one minute. The portfolio is still live on Vercel at this point and I want no downtime. DNS propagation takes time, so I start it and let it run in the background while I do everything else.
Phase 2 · The user
First login as root with the password from phase 1. Working as root is a bad habit, so a real user gets created immediately, with a password and sudo rights.
Then the SSH key. Unlike some providers, NetCup does not inject your public key at order time — you start with a password. That gets fixed next.
# On your own machine, if you do not have a key yet
ssh-keygen -t ed25519 -C "damjan@coderconda"

# On the server
mkdir -p ~/.ssh && chmod 700 ~/.ssh
sudo apt update && sudo apt install nano
nano ~/.ssh/authorized_keys        # paste the public key as one line
chmod 600 ~/.ssh/authorized_keys
The public key ends up on the server, the private key stays on my machine.
And then the part that actually changes daily life: I do not want to type an IP address any more. On your own machine — on Windows at C:\Users\<name>\.ssh\config — add a block:
Host coderconda
  HostName 203.0.113.10
  User damjan
  IdentityFile ~/.ssh/id_ed25519
  IdentitiesOnly yes
After that the whole login is one word:
ssh codercondaPhase 3 · Hardening
This machine has a public IP and a working password login. Within about ten minutes of going live, bots start knocking on port 22. That is not paranoia, that is just the internet.
SSH
sudo nano /etc/ssh/sshd_config.d/99-hardening.confPermitRootLogin no
PasswordAuthentication no
KbdInteractiveAuthentication no
PubkeyAuthentication yes
MaxAuthTries 3
AllowUsers damjanRoot login off, password login off entirely, one user allowed in. Test the syntax before restarting:
sudo sshd -t
sudo systemctl restart ssh
Do not close this terminal. Open a second window and test the login there. If it works, you are safe. If it does not, you still have the open session to undo it. And if you close both anyway, you have the snapshot from phase 1 and the remote console in SCP — which works even when SSH does not.
That is exactly what happened to me: I had the wrong name in AllowUsers and locked myself out. The second window is there for precisely this.
The firewall
Here is a real difference from some other providers: NetCup does not give you a separate network-level firewall you click together. Your firewall is the one on the machine. So this step is not optional here.
sudo ufw default deny incoming
sudo ufw default allow outgoing
sudo ufw allow OpenSSH
sudo ufw allow 80/tcp
sudo ufw allow 443/tcp
sudo ufw enable
Three ports open, everything else closed.
fail2ban
sudo apt install fail2ban
sudo systemctl enable --now fail2ban
Configured for a one-hour ban after three failed login attempts. What happened in the video: fail2ban banned my own machine's IP, and I had to go in through the SCP console to unban it. That is another argument for the remote console.
Auto updates
sudo apt install unattended-upgrades
sudo dpkg-reconfigure --priority=low unattended-upgrades
DDoS cover
DDoS protection is included on every NetCup root server at no extra cost, with filtering capacity in the range of two terabits per second. That is the network layer. The HTTP layer comes later, in phase 7.
Phase 4 · Claude Code
This is the part that makes the rest fast. Instead of writing nginx configs by hand, I install Claude Code on the server and let it do the work.
# after installing, make sure claude is on the PATH
which claude
claude --version
On a headless server there is no browser. So the login prints a URL you open on your own machine, where you are already signed in, and you paste the returned code back into the terminal.
One detail that belongs in the picture: halfway through this phase a 529 overloaded came back. According to the status page there were elevated error rates across all models at the time, known for about two hours. So: a break, and afterwards the same prompt went through. Anyone planning a migration should budget for the tools in the chain occasionally not being there.
Phase 5 · Gitea
Gitea is a self-hosted git service. GitHub, but yours, and it runs in about 200 megabytes of RAM. I use Docker because it is the fastest path in and the cleanest path back out.
The compose file contains the single most important line in the whole video:
ports:
  - '127.0.0.1:3000:3000'
Not 3000:3000. The reason: Docker writes its own iptables rules and punches straight through UFW. Publish a port the usual way and your firewall does not stop it. And on this server UFW is the only firewall there is — so this one line weighs more here than it would anywhere else. Binding to localhost means only nginx on the same machine can reach it.
Then nginx and certbot, and this is where I let Claude Code work:
Install nginx and certbot. Create an nginx site for git.damjan-savic.com
that reverse proxies to 127.0.0.1:3000, with client_max_body_size 512M and
the standard proxy headers. Enable it, test the config, reload nginx.
One limitation showed up here: sudo cannot prompt for a password in that environment. The install commands had to run in a real terminal window; after that Claude Code carried on, verified the install and wrote the configuration. I also used ChatGPT alongside it to format the commands onto a single line — that belongs in the honest version too.
Then the certificate:
sudo certbot --nginxThis is where phase 1 pays off: the DNS record from earlier has propagated by now, so the challenge goes straight through. After that, open git.damjan-savic.com in a browser, confirm SQLite as the database, leave the paths as they are, set the site title, and create the administrator account. Own git server, done.
Phase 6 · The move
Gitea ships a migration tool, which makes this easier than it sounds. You need a GitHub token (Settings → Developer Settings → Personal Access Tokens → Tokens (classic)), then in Gitea: "New Migration", pick GitHub, enter the token, set owner and repository name, tick issues, labels and releases.
What lands is not a copy of the latest state, it is the repository: full commit history, all branches, all issues.
There is one decision in it: the "This repository will be a mirror" checkbox. Tick it and GitHub stays the source of truth while Gitea just follows. I left it off, because Gitea is primary from here on.
So on my own machine:
git remote set-url origin https://git.damjan-savic.com/damjan/portfolio.git
git pull --rebase
git push
The first push was rejected — fetch first. So pull, then push. After that my machine pushes to my own server.
Phase 7 · Going live
Clone on the server, install, build:
cd ~ && git clone https://git.damjan-savic.com/damjan/portfolio.git
cd portfolio
corepack prepare pnpm@latest --activate
pnpm install --frozen-lockfile
pnpm build
What needed fixing here was the configuration that had been pointed at Vercel — a project built there has assumptions written into it that no longer hold on a bare machine.
Then it runs as a Node process behind nginx, managed by PM2, on port 3001 — 3000 is taken by Gitea:
pm2 start .next/standalone/server.js --name portfolio
pm2 save
pm2 logs portfolio
And nginx again, again through Claude Code:
Create an nginx site for damjan-savic.com and www.damjan-savic.com that
proxies to 127.0.0.1:3001. Add a limit_req_zone in the http block at 20
requests per second and apply it in the location block with burst=40
nodelay. Add gzip and the standard security headers.
Claude wrote the configuration and handed back three points explicitly as open decisions rather than making them silently: no TLS block, because I had not asked for one; the rate limit also covers the static files under /_next/static; and the redirect between www and apex is still missing, both hostnames currently serving identical content.
That is the application-layer rate limiting. NetCup absorbs the flood at the network layer; this handles the HTTP flood. It will not stop a serious botnet, but it will stop a single script hammering the server.
The switch
This is the only moment the site is genuinely at risk, so it is quick. At the DNS provider:
- Delete the A record pointing at Vercel.
- Delete the
wwwCNAME pointing atcname.vercel-dns.com. - Add an A record to the server IP.
- Add a second A record for
wwwto the same IP.
Then wait and check rather than guess:
dig damjan-savic.com +shortIn my case www had already propagated while the bare domain still pointed at Vercel — one old record I had missed. A few minutes later that one was right too. Then certbot once more, and the site stands: my server, my certificate, my git history. The Vercel project can go.
Four failure modes
- You locked yourself out over SSH. Open SCP and use the remote console — it works even when SSH does not. If that fails too, restore the snapshot from phase 1.
- certbot fails with a challenge error. Your DNS has not propagated. Check with
dig, wait, run it again. Nothing else is wrong. - A Docker container is reachable from the internet even though UFW says the port is closed. That is the iptables issue above. Check every
portsentry in every compose file: it has to begin with127.0.0.1:. - Traffic throttling. The flat rate is real, but past roughly 3 TB in 24 hours you get throttled to 300 Mbit. For a portfolio site this will never come up.
The pattern
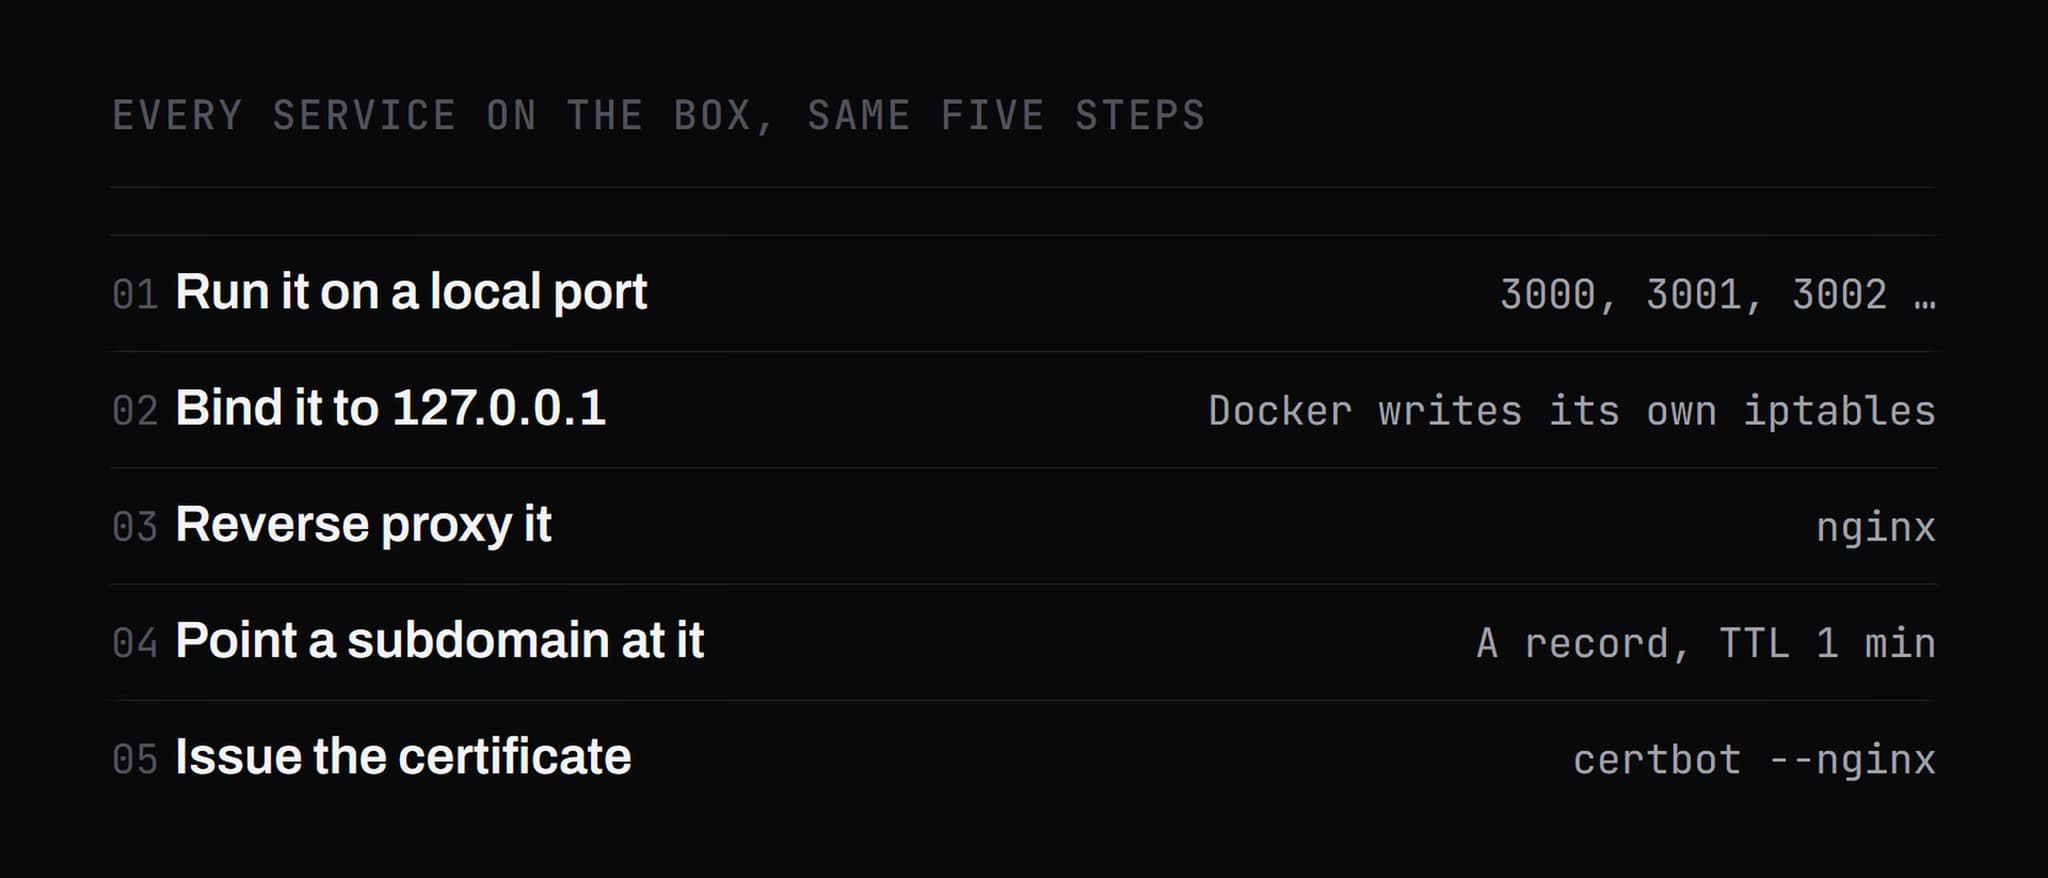
Once you have seen it once, anything else can go on the same server. The structure is always the same:
- Run the service on a local port
- Bind it to
127.0.0.1 - Reverse proxy it through nginx
- Point a subdomain at it
- Run certbot
Gitea on 3000, portfolio on 3001, the next thing on 3002.
The same five steps every time. With 16 gigabytes of RAM there is plenty of room. And every one of those steps is something Claude Code can write for you, once you tell it the port and the domain.
What is missing
Honestly: automatic deployment. Right now I still have to pull and rebuild by hand. A Gitea webhook and a five-line shell script fix that. After it, the obvious next steps are Uptime Kuma for monitoring, automated snapshots, n8n, a Postgres instance, or Cloudflare in front.
Takeaway
Self-hosting is not hard any more. It is just unfamiliar. Seven phases, one server, 30 euros a month, no contract — and the whole pipeline is mine.